Plan Layers
Plan Layers
Plans in BuilderZen Foundations are made up of modular pieces called "layers."
Plan Layers serve as reusable buckets/containers that can be used to group together takeoff materials according to when the materials are needed.
Example
An example Plan 2000 could have three different Elevations (A, B, and C).
Much of the material needed to build each version stays the same, and some of the material needed to build each elevation is different. All of the material that is unique to Elevation A can be built in an Elevation A layer, and so on. By entering the material in separate layers, the base layer can be combined with each elevation layer to bring all of the takeoff items together in the appropriate combination.
This "layered" combination is called a "Sales Configuration" in Foundations and represents a sellable plan configuration that can be sold in a Community.
When quantities do not vary for several plans, layering allows you to estimate components once and group them in logical segments or layers. Now the same grouping can be used over several elevations of the same plan and/or over several plans.
For example, an elevation layer such as 2000A, would contain those items that are unique to the A elevation of Plan 2000. That could include the windows on the front elevation, shutters, or a particular Fypon trim.
Single-family constructions include the following elements:
Base Layer - holds takeoff items that are the same in every elevation.
Elevation Layers – one layer/elevation for takeoff items that are needed to build JUST that elevation.
Other Layers – depending on the company, there may be "interchangeable" parts, such as two or three car garage or decks that can be built in their own layers and reused later with multiple plan configurations.
Multi-family constructions include the following elements:
Building shell layer -- stores takeoff items that are used to build the building shell.
Unit Layers -- There is one layer/unit for takeoff items that are needed to build JUST that unit.
Elevation Layers -- Elevation layers vary greatly by company. If individual units have separate elevations, the user may need to build layers for each different elevation in each different unit. If there are specific changes based on the location of the unit (i.e., corner vs. interior), these changes can be built once, and then re-used with many different plan configurations.
Other Layers -- Other layers depend on each division. Additional layers are built to group takeoff items for later use. Remember, each layer can be used in one or more plan configurations. Dividing material into layers now will provide the flexibility needed to combine it at a later time.
Most companies will also have layers in a general plan according to the following:
General Layer -- includes takeoff items that are used in every company plan.
Product Series Layers -- include takeoff items that are used in every plan within a specific product series.
Special Layers
Special layers vary by company. If there are certain building components such as 3-car garage or 12x12 deck that are identical in several different plans, building a layer in the general plan to store those takeoff items will allow you to build an estimate one time. This information can then be used in several different areas.
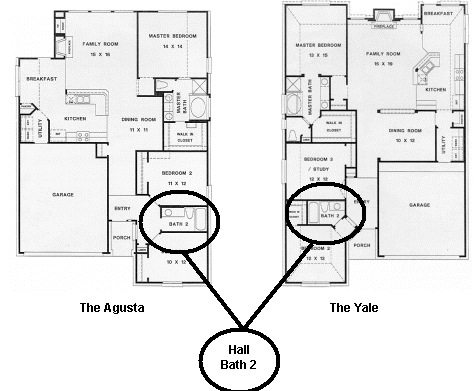
For example, consider plumbing layer for hall bath 2 with 1 sink bowl. The components are as follows:
- Marble sink bowl with a quantity of 1
- Vanity faucets (include all faucet types) with a quantity of 1
- Bath tub (include all tub types) with a quantity of 1
- Tub surround (all types) specific quantity for each kind
- Tub faucets (include all faucet types) with a quantity of 1
- Toilet (all types) with a quantity of 1
- Lights (all types) with a quantity of 1
- HVAC vent
- Hardware and locks (all types)
- Greenrock behind tub
- Medicine cabinet
This general layer can be used for every plan that has a hall bath with a one-bowl sink. The takeoff will only need to be done once under a generic "All" plan.
Adding Plan Layers
To add plan layers:
Navigate to the Plan Detail screen.
Click Layers at the top of the Plan Detail screen.
Click the Add Plan Layer button in the browser toolbar.

- Enter the Layer Name.
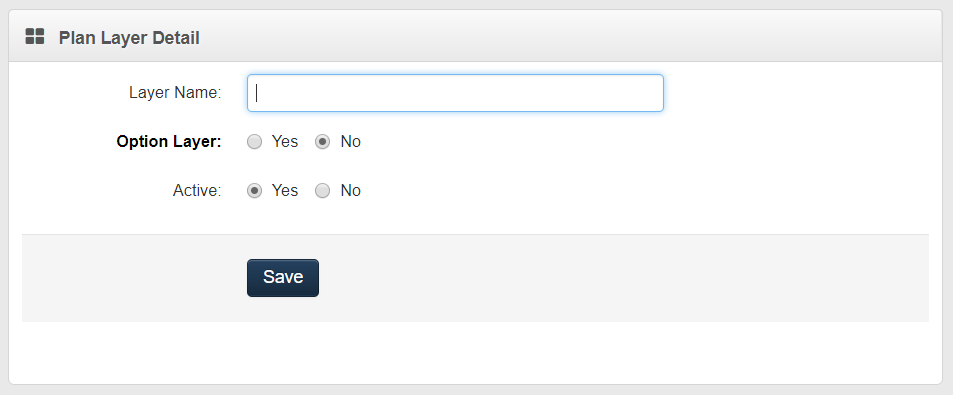
To designate a layer as an Option Layer, click the Yes checkbox. No is the default. Click No for layers that contain any items that are a part of the standard or base house takeoff (even if the layer contains some optional items).
Select Yes or No for active plan layer (record). By choosing No, the layer will not be shown is the standard layer browser view and can not be chosen from any pick lists.
Click Save.